5️⃣ The LTCGI_Screen component
The LTCGI_Screen component is the most important part of LTCGI. This is what controls the emission of light into your scene.
It must be placed on an object containing a Mesh Filter (generally in combination with a Mesh Renderer, but that part is not mandatory - you can have an invisible light source that way). Light will be emitted (and reflected) in the shape of the mesh selected on the Mesh Filter. The mesh must have exactly 3 or 4 vertices! UV Maps are supported, so textured light sources (video or static) can be UV'd.
⚠️ NOTE: There is also the
LTCGI_Emittercomponent, which can only emit non-textured, baked diffuse light, but has no geometry restrictions. Most likely you want to use anLTCGI_Screencomponent.
To create a light source, place a 4-vertex mesh into your scene (Unity's built-in Quad will do) and add the component in the inspector window. If you have completed the previous step and are using an LTCGI-enabled material, you should see the mesh start to emit white light.
⚠️ Note that disabling GameObjects or components with a screen or emitter on them is not supported, neither in editor nor in-game! Check "Basic Toggle" to see how you can enable or disable LTCGI globally. Setting the color to Black (0,0,0) will disable a single screen entirely, such that it can be re-enabled via
_SetColorusing the UdonSharp API.
If it doesn't immediately work, try hitting "CTRL-S" to save your scene. This will force an LTCGI update as well, it's generally a good idea to keep hitting that while working on an LTCGI project any Unity project. Backups as well, people!
Mesh Rendering
It is very important to understand that the component only defines how the light is rendered. It does not change the appearance of the mesh itself! For example, you can have a blue mesh with an orange light:
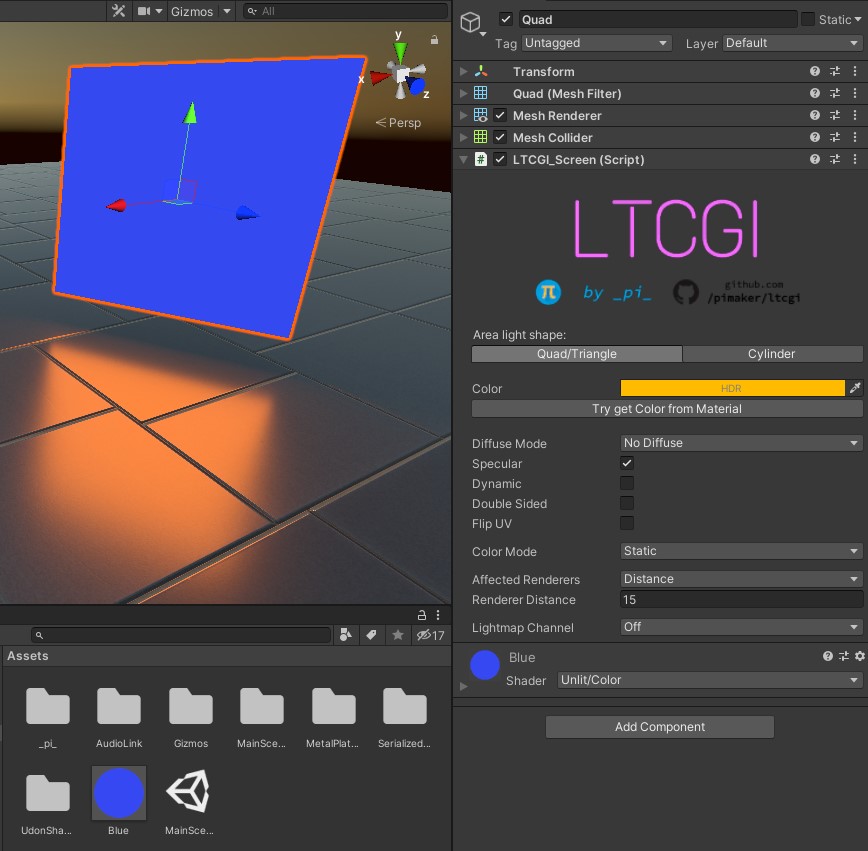
You need to ensure that the mesh itself looks the same as the light it emits yourself, usually by changing the normal material on the Renderer!
Component Settings
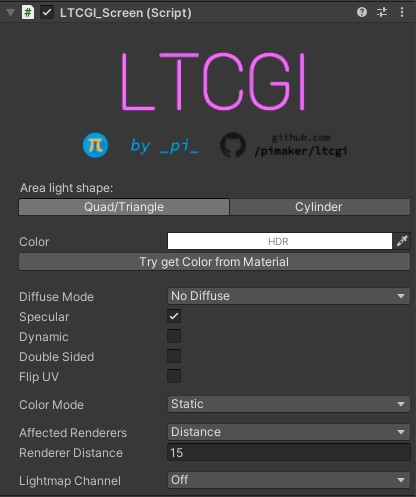
Basic Settings
| Area light shape | Defines the type of light mesh. Quad/Triangle allows you to use any mesh with 3 or 4 vertices. Cylinder is experimental and allows you to define a cylindrical shape that will emit light. |
| Color | The base color of this light. Will also be applied on textured lights as a multiplier, leave as White (1,1,1) to show textures unmodified. Supports HDR to increase brightness! |
| Try get Color from Material | Tries to load the exact color used on the Renderer's material (as _Color). |
Light Settings
| Diffuse Mode | Defines how the light emits diffuse light. Options are No Diffuse to disable for performance, LTC Diffuse to use the LTC algorithm's version of diffuse or Lightmap Diffuse to directly use the data calculated in the Shadowmap bake. It is recommended to try these options in your particular environment, often times specular is enough, and diffuse can be left off for increased performance. |
| Specular | Determines if specular light is emitted (reflections). |
| Dynamic | Marks this screen as dynamic. Comes with slight performance overhead, but allows moving the screen and changing its color at runtime. |
| Double Sided | If this screen emits light on both sides of the mesh. |
| Flip UV | Workaround. Some models imported from Blender or other 3D software can have flipped reflections. If you notice this, you can set this flag to un-flip them. (If anyone can tell me why this happens and has a more permanent fix, please let me know!) |
| Affect Avatars | If this screen should affect avatars that use an LTCGI-compatible shader. Note that distance or renderer masking does not apply to avatars, so use this setting to keep performance-impact on avatars to a minimum. ⚠️ It's recommended to use Light Volumes instead! |
| Affect Light Volumes | If this screen should be rendered into VRC Light Volumes. This only applies when Lightmap Diffuse is enabled and a lightmap channel is selected. |
Color Mode
The Color Mode property describes where the color for the light is coming from. It has 4 options:
| Static | The entire screen is lit up in the color set on the component. |
| Texture | The screen takes it's color values from a texture. This texture can be specified with the slider labeled Texture Index, which will select either the live video texture (0) or any one of the Static Textures you previously added to the Controller. |
| Single UV | Like Texture, but will light up the screen in a single color taken from the texture at the exact UV coordinate you specify below. |
| Audio Link | See AudioLink. Selects an AudioLink band and optional delay for audio-reactive light. |
Affected Renderers
Selects which Renderers in your scene should receive light from this screen. This can include MeshRenderer and SkinnedMeshRenderer components using compatible materials. See the section on Performance Optimization for more.
Lightmap Channel
Selects which lightmap channel this screen will occupy when baking a shadowmap. See section on Shadowmaps for more.